TIME

NEPAL QATAR BELFAST, UK MALAYSIA DUBAI

Thursday, June 1, 2023

Hashdb-Ida - HashDB API Hash Lookup Plugin For IDA Pro


HashDB IDA Plugin

Malware string hash lookup plugin for IDA Pro. This plugin connects to the OALABS HashDB Lookup Service.


Adding New Hash Algorithms

The hash algorithm database is open source and new algorithms can be added on GitHub here. Pull requests are mostly automated and as long as our automated tests pass the new algorithm will be usable on HashDB within minutes.


Using HashDB

HashDB can be used to look up strings that have been hashed in malware by right-clicking on the hash constant in the IDA disassembly view and launching the HashDB Lookup client.


Settings

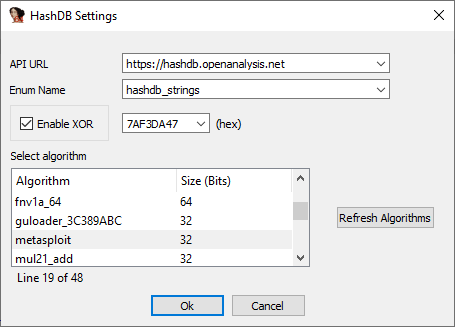
Before the plugin can be used to look up hashes the HashDB settings must be configured. The settings window can be launched from the plugins menu Edit->Plugins->HashDB.


Hash Algorithms

Click Refresh Algorithms to pull a list of supported hash algorithms from the HashDB API, then select the algorithm used in the malware you are analyzing.


Optional XOR

There is also an option to enable XOR with each hash value as this is a common technique used by malware authors to further obfuscate hashes.


API URL

The default API URL for the HashDB Lookup Service is https://hashdb.openanalysis.net/. If you are using your own internal server this URL can be changed to point to your server.


Enum Name

When a new hash is identified by HashDB the hash and its associated string are added to an enum in IDA. This enum can then be used to convert hash constants in IDA to their corresponding enum name. The enum name is configurable from the settings in the event that there is a conflict with an existing enum.


Hash Lookup

Once the plugin settings have been configured you can right-click on any constant in the IDA disassembly window and look up the constant as a hash. The right-click also provides a quick way to set the XOR value if needed.


Bulk Import

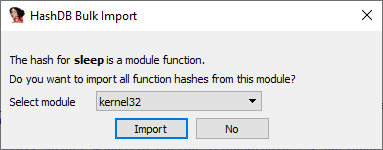
If a hash is part of a module a prompt will ask if you want to import all the hashes from that module. This is a quick way to pull hashes in bulk. For example, if one of the hashes identified is Sleep from the kernel32 module, HashDB can then pull all the hashed exports from kernel32.


Algorithm Search

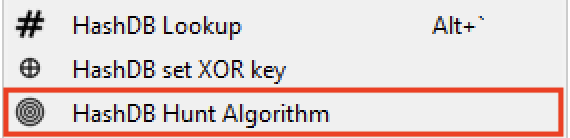
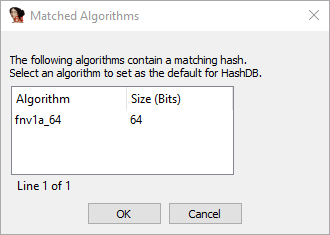
HashDB also includes a basic algorithm search that will attempt to identify the hash algorithm based on a hash value. The search will return all algorithms that contain the hash value, it is up to the analyst to decide which (if any) algorithm is correct. To use this functionality right-click on the hash constant and select HashDB Hunt Algorithm.


All algorithms that contain this hash will be displayed in a chooser box. The chooser box can be used to directly select the algorithm for HashDB to use. If Cancel is selected no algorithm will be selected.


Dynamic Import Address Table Hash Scanning

Instead of resolving API hashes individually (inline in code) some malware developers will create a block of import hashes in memory. These hashes are then all resolved within a single function creating a dynamic import address table which is later referenced in the code. In these scenarios the HashDB Scan IAT function can be used.


Simply select the import hash block, right-click and choose HashDB Scan IAT. HashDB will attempt to resolve each individual integer type (DWORD/QWORD) in the selected range.


Installing HashDB

Before using the plugin you must install the python requests module in your IDA environment. The simplest way to do this is to use pip from a shell outside of IDA.
pip install requests

Once you have the requests module installed simply copy the latest release of hashdb.py into your IDA plugins directory and you are ready to start looking up hashes!


Compatibility Issues

The HashDB plugin has been developed for use with the IDA 7+ and Python 3 it is not backwards compatible.


More info


Linux Command Line Hackery Series: Part 2


Welcome back to Linux Command Line Hackery, yes this is Part 2 and today we are going to learn some new skills. Let's rock

Let us first recap what we did in Part 1, if you are not sure what the following commands do then you should read Part 1.

mkdir myfiles                                                # make a directory (folder) with myfiles as name
cd myfiles                                                      # navigate to myfiles folder
touch file1 file2 file3                                    # create three empty files file1file2file3
ls -l                                                                   # view contents of current directory
echo This is file1 > file1                               # write a line of text to file1
cat file1                                                           # display contents of file1
echo This is another line in file1 >> file1    # append another line of text to file1
cat file1                                                          # display the modified content of file1

Command:  cp
Syntax:        cp source1 [source2 ...] destination
Function:     cp stands for copy. cp is used to copy a file from source to destination. Some important flags are mentioned below
Flags:          -r copy directories recursively
                     -f if an existing destination file cannot be opened, remove it and try  again

Let us make a copy of file1 using the new cp command:

cp file1 file1.bak

what this command is going to do is simply copy file1 to another file named file1.bak. You can name the destination file anything you want.
Say, you have to copy file1 to a different folder maybe to home directory how can we do that? well we can do that like this:

cp file /home/user/

I've used the absolute path here you can use whatever you like.
[Trick: ~ has a special meaning, it stands for logged in user's directory. You could have written previous command simply as
cp file1 ~/
and it would have done the same thing.]
Now you want to create a new directory in myfiles directory with the name backup and store all files of myfiles directory in the backup directory. Let's try it:

mkdir backup
cp file1 file2 file3 backup/

this command will copy file1 file2 file3 to backup directory.
We can copy multiple files using cp by specifying the directory to which files must be copied at the end.
We can also copy whole directory and all files and sub-directories in a directory using cp. In order to make a backup copy of myfiles directory and all of it's contents we will type:

cd ..                                           # navigate to previous directory
cp -r myfiles myfiles.bak       # recursively copy all contents of myfiles directory to myfiles.bak directory

This command will copy myfiles directory to myfiles.bak directory including all files and sub-directories

Command: mv
Syntax:       mv source1 [source2 ...] destination
Function:    mv stands for move. It is used for moving files from one place to another (cut/paste in GUI) and also for renaming the files.

If we want to rename our file1 to  file1.old in our myfiles folder we'll do the follow:

cd myfiles                                      # navigate first to myfiles folder
mv file1 file1.old

this command will rename the file1 to file1.old (it really has got so old now). Now say we want to create a new file1 file in our myfiles folder and move the file1.old file to our backup folder:

mv file1.old backup/                    # move (cut/paste) the file1.old file to backup directory
touch file1                                    # create a new file called file1
echo New file1 here > file1         # echo some content into file1

Command:  rmdir
Syntax: rmdir directory_name
Function: rmdir stands for remove directory. It is used for removing empty directories.

Let's create an empty directory in our myfiles directory called 'garbage' and then remove it using rmdir:

mkdir garbage
rmdir  garbage

Good practice keep it doing. (*_*)
But wait a second, I said empty directory! does it mean I cannot delete a directory which has contents in it (files and sub-directories) with rmdir? Yes!, you cannot do that with rmdir
So how am I gonna do that, well keep reading...

Command:  rm
Syntax:        rm FILE...
Function:     rm stands for remove. It is used to remove files and directories. Some of it's important flags are enlisted below.
Flags:          -r remove directories and their contents recursively
                     -f ignore nonexistent files and arguments, never prompt

Now let's say we want to delete the file file1.old in backup folder. Here is how we will do that:

rm backup/file1.old                # using relative path here

Boom! the file is gone. Keep in mind one thing when using rm "IT IS DESTRUCTIVE!". No I'm not yelling at you, I'm just warning you that when you use rm to delete a file it doesn't go to Trash (or Recycle Bin). Rather it is deleted and you cannot get it back (unless you use some special tools quickly). So don't try this at home. I'm just kidding but yes try it cautiously otherwise you are going to loose something important.

Did You said that we can delete directory as well with rm? Yes!, I did. You can delete a directory and all of it's contents with rm by just typing:

rm -r directory_name

Maybe we want to delete backup directory from our myfiles directory, just do this:

rm -r backup

And it is gone now.
Remember what I said about rm, use it with cautious and use rm -r more cautiously (believe me it costs a lot). -r flag will remove not just the files in directory it will also remove any sub-directories in that directory and there respective contents as well.

That is it for this article. I've said that I'll make each article short so that It can be learned quickly and remembered for longer time. I don't wanna bore you.

More info


  1. Hacker Hardware Tools
  2. Pentest Tools Framework
  3. Hacking Tools Kit
  4. Hack Tools Github
  5. Pentest Tools For Ubuntu
  6. Best Pentesting Tools 2018
  7. Computer Hacker
  8. Pentest Tools For Ubuntu
  9. Hacking Tools 2019
  10. Hack Tools For Pc
  11. Hacking Tools Windows 10
  12. Best Hacking Tools 2019
  13. Bluetooth Hacking Tools Kali
  14. Hacking Tools For Kali Linux
  15. Pentest Tools Url Fuzzer
  16. Underground Hacker Sites
  17. Pentest Tools Url Fuzzer
  18. Easy Hack Tools
  19. Pentest Tools For Mac
  20. Hacker Search Tools
  21. Computer Hacker
  22. Hack Tools For Mac
  23. Hack Tools For Windows
  24. Best Hacking Tools 2019
  25. Hack Tool Apk No Root
  26. Growth Hacker Tools
  27. Pentest Recon Tools
  28. Kik Hack Tools
  29. Best Hacking Tools 2019
  30. Hacker Tools List
  31. Usb Pentest Tools
  32. Hacking Apps
  33. Pentest Tools Android
  34. Hacking Tools And Software
  35. Beginner Hacker Tools
  36. Hacking Tools For Kali Linux
  37. Hacking Tools Name
  38. Hacker Tools Github
  39. How To Hack
  40. Ethical Hacker Tools
  41. Computer Hacker
  42. Pentest Tools Android
  43. Hack Tools 2019
  44. Best Hacking Tools 2020
  45. Hacking Tools For Games
  46. Hack Website Online Tool
  47. Hacker Tools Hardware
  48. Game Hacking
  49. Pentest Tools Port Scanner
  50. Hack Tools Pc
  51. How To Make Hacking Tools
  52. Hacker Techniques Tools And Incident Handling
  53. Hacking Tools Free Download
  54. Pentest Tools Subdomain
  55. Hackers Toolbox
  56. Growth Hacker Tools
  57. Hack And Tools
  58. Hacker Techniques Tools And Incident Handling
  59. New Hacker Tools
  60. Hacker Tools Hardware
  61. Hacker Tools 2019
  62. Hacking Tools For Windows 7
  63. Usb Pentest Tools
  64. Hack And Tools
  65. Hacking Tools For Games
  66. World No 1 Hacker Software
  67. Hacker Security Tools
  68. Best Pentesting Tools 2018
  69. Hacker Tools List
  70. Hack Tool Apk No Root
  71. Tools 4 Hack
  72. Free Pentest Tools For Windows
  73. Hacking Tools Name
  74. Hack Apps
  75. Best Pentesting Tools 2018
  76. Hacking Tools For Kali Linux
  77. Pentest Tools For Mac
  78. Hack Tools For Mac
  79. Pentest Tools Android
  80. Hacks And Tools
  81. Hacker Tools For Windows
  82. Hack Apps
  83. Pentest Tools Free
  84. Best Hacking Tools 2019
  85. Ethical Hacker Tools
  86. Pentest Tools Subdomain
  87. Best Hacking Tools 2019
  88. Hacker Tool Kit
  89. Hack Tool Apk No Root
  90. Hacking Tools Pc
  91. Blackhat Hacker Tools
  92. Hack Tool Apk No Root
  93. Pentest Tools Port Scanner
  94. Hacking Tools Windows
  95. Android Hack Tools Github
  96. Hacking App
  97. Hacking App
  98. Pentest Tools Tcp Port Scanner
  99. Hacking Tools Kit
  100. Nsa Hack Tools Download
  101. Hacker Tools Apk Download
  102. Growth Hacker Tools
  103. Hacker Tools 2019
  104. Black Hat Hacker Tools
  105. Hack Tools
  106. Termux Hacking Tools 2019
  107. Pentest Tools Open Source
  108. Pentest Tools For Ubuntu
  109. Hackrf Tools
  110. Hack Tools Pc
  111. Hacking Tools And Software
  112. Best Hacking Tools 2019
  113. Hackers Toolbox
  114. Hacker Search Tools
  115. Game Hacking
  116. Hacking App
  117. Github Hacking Tools
  118. Hacking Tools Free Download
  119. Hacker Security Tools
  120. Hacker Tools For Windows
  121. Hacking Tools For Kali Linux
  122. Computer Hacker
  123. Pentest Tools Website Vulnerability
  124. Best Hacking Tools 2020
  125. Best Pentesting Tools 2018
  126. Nsa Hack Tools
  127. Hacker Tools List
  128. Bluetooth Hacking Tools Kali
  129. Blackhat Hacker Tools
  130. Hack Tools
  131. Hack Tools
  132. Hacking Apps
  133. Pentest Box Tools Download
  134. Hak5 Tools
  135. Wifi Hacker Tools For Windows
  136. Pentest Tools Framework
  137. Hacking Tools Mac
  138. Hacking Tools Windows
  139. Hacker Tools Windows
  140. Pentest Tools Windows
  141. Pentest Tools Nmap
  142. Hacker Tools Apk
  143. Wifi Hacker Tools For Windows
  144. Free Pentest Tools For Windows